Creative · All levels
Sculpt tiny animals from wool, one project at a time
A library of complete needle-felting masterclasses that take you from a loose tuft of wool to a finished miniature character with a face, a posture and a personality.
- 60+ complete video masterclasses
- Step-by-step from blank to finish
- Patterns and reference sheets included
- Lifetime access to the library
- 14-day money-back guarantee
Why miniature felting is harder than it looks
You have probably tried needle felting already. A ball of wool, a couple of needles, a picture of a charming little animal — and forty minutes later a slightly lumpy shape that looks nothing like the picture. The problem is rarely talent. It is that most tutorials show the finished result and skip the decisions that produce it: how dense the blank should be, where the shape is built up and where it is compressed, how the legs attach, how a face stops being a smudge and starts being a character.
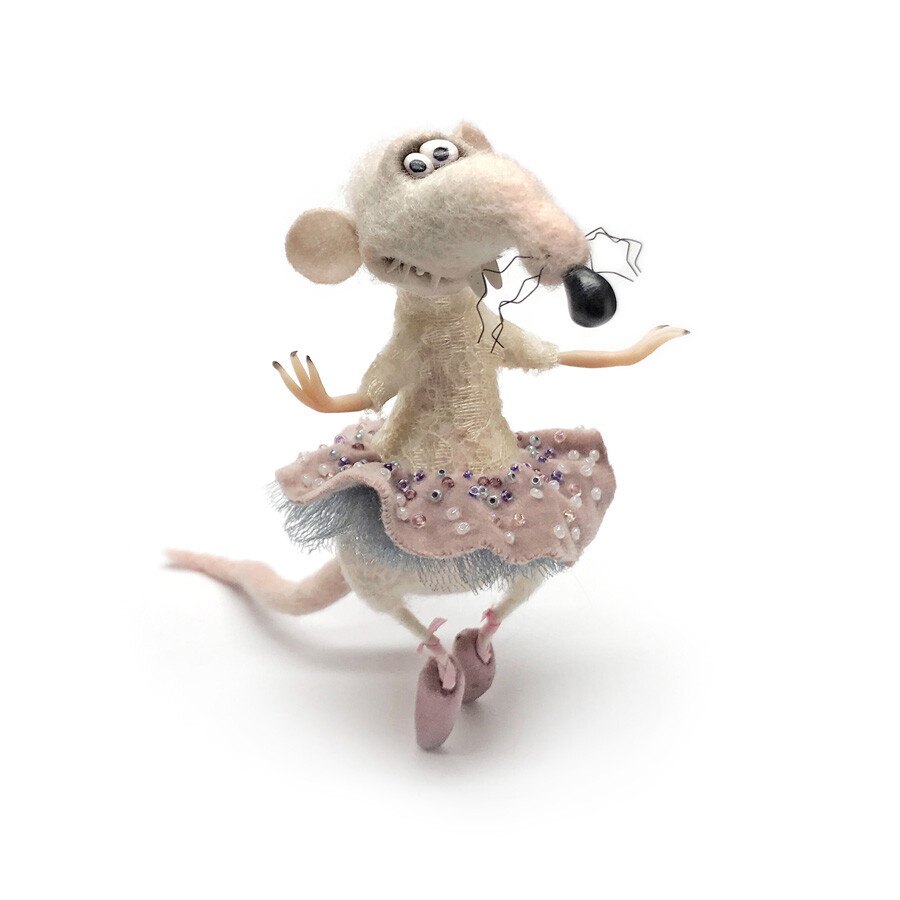
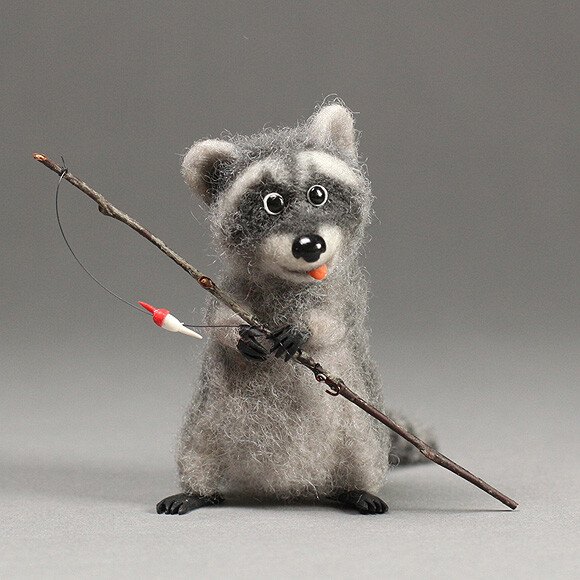
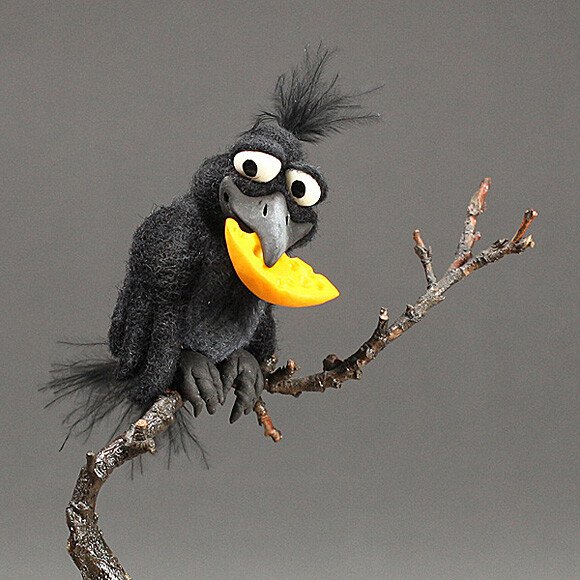
This library exists to close that gap. It collects full-format video masterclasses, each one devoted to a single finished project — a rat in a ballerina skirt, a raccoon holding a fishing rod, a crow with a piece of cheese in its beak. Every project is filmed from the first tuft of wool to the last trim, with the intermediate steps left in rather than cut away.
Because the projects share one underlying method, working through several of them does something a single tutorial cannot: the technique starts to stick. You learn the basic blank, the theory of phases and the way glued felt is used for wings and petals, and then you meet the same ideas again in a bird, a rodent, a fantasy creature. By the fifth or sixth project you are no longer following instructions — you are making decisions.
Everything is self-paced. You choose the project that appeals to you today, watch the lesson, felt along, and come back when you have an evening free. The library stays open for as long as you need it.
What you will be able to do
Each ability below is taught inside the projects, not in the abstract.
- Build a dense, even blank that holds its shape
The foundation of every figure: firm, symmetrical and free of soft spots.
- Shape a believable animal head
Muzzle, cheeks, brow and eye sockets built up in the right order.
- Attach limbs, tails and ears that stay put
Joints that survive handling and keep the posture you intended.
- Work with wire armatures and external frames
For slender legs, long necks and figures that need to stand on their own.
- Make glued felt for wings, petals and flat parts
A separate technique with its own rules for thin, crisp shapes.
- Sculpt miniature props and accessories
Cheese, ice cream, boots, hooves and the small details that sell a scene.
- Set expressive eyes and thin eyelids
The step that turns a well-made shape into a character with a look.
- Finish a figure cleanly
Surface work, pastel tinting and the final trimming that sharpens the silhouette.
- Design your own character
Use the phase-based method to plan a figure that is not in the library.
- 60+
- video masterclasses
- 8
- themed modules
- 5–6 cm
- typical figure height
- Lifetime
- access to the library
The method: blank first, character second
Every project in the library follows the same logic. You start with a blank — a compact, evenly needled volume that already carries the proportions of the future animal. Nothing decorative happens until that blank is right, because a soft or lopsided core will show through every layer you add afterwards.
From there the figure is built in phases. Volume is added where the animal is heavy and compressed where it is thin; the head is shaped before the features are placed; the limbs are prepared separately and joined only when they hold their own form. It is a slower way to start and a much faster way to finish.
The raccoon project is a good example of how the phases stack. The body blank is built first, then the characteristic hunched posture, then the tail, then the paws that grip the fishing rod, and only at the end the mask markings and the eyes. Watching the whole sequence once explains more than a dozen isolated tips.
- Dense core before any surface detail
- Proportions checked against the reference sheet
- Limbs and props made separately, joined last
- Face and eyes as the final stage, never the first
How the library works
The library is a collection of recorded masterclasses, grouped into eight themed modules. Each masterclass is a complete project: you see the materials laid out, the blank built, the shape refined, the details added and the figure finished. Nothing is time-lapsed into a blur, and the tricky moments — setting an eye, hiding a wire, getting two ears to match — are shown at normal speed with the reasoning explained.
Each video comes with an appendix: the pattern or schematic for that project, reference drawings, a list of the wool colours and materials used, and links to the specific supplies. You can print the sheets or keep them open on a second screen while you work.
You do not have to follow the modules in order. Some people start with the small rodents because they are quick and forgiving; others go straight for the bird they have always wanted to make. The first module covers tools, blanks and the theory of phases, so it is worth watching once even if you have felted before — it is the grammar that the rest of the library is written in.
There is no schedule and no deadline. Lessons are available immediately after purchase and stay available, so a project can be paused halfway through a leg and picked up a fortnight later.
The programme
Eight modules, each built from complete project masterclasses plus the technique lessons they depend on.
1Module 1 — Tools, blanks and the theory of phasesThe shared foundation every other project relies on.6 lessons
- Materials and tools for miniature felting
- The basic ball: your first dense blank
- Convenient blank shapes and when to use each
- The theory of phases: building a figure layer by layer
- Glued felt: the basics of the technique
- Useful small tools: geotextile, brushes and pipe cleaners
2Module 2 — Rodents and small mammalsSmall figures that teach proportion, density and speed.6 lessons
- Rat in a ballerina skirt
- Hamster
- Squirrel
- Jerboa
- Tenrec
- Hedgehog
3Module 3 — Dogs and other four-legged charactersPosture, paws and the anatomy of a convincing stance.6 lessons
- Jack Russell terrier
- Yard dog with a bone
- Raccoon with a fishing rod
- Fox
- Goat
- Sheep
4Module 4 — Wild animals and big catsLarger volumes, markings and figures that must stand unaided.6 lessons
- Tiger
- Zebra
- Giraffe
- Rhinoceros
- Armadillo
- Meerkat family
5Module 5 — BirdsFeather layering, beaks, long legs and a sense of balance.6 lessons
- Crow with a piece of cheese
- Penguin
- Pelican
- Crowned crane
- Secretary bird
- Flamingo
6Module 6 — Butterflies, insects and glued felt wingsThin, crisp shapes made with the glued felt technique.5 lessons
- Glued felt: the peacock eye wing
- Glued felt: the common blue wing
- Little moth
- Stag beetle
- Chameleon
7Module 7 — Fantasy characters and story scenesWhere the method loosens up and the figures get a story.6 lessons
- Dragons
- Snake
- Bat with fangs
- Microbes
- Steampunk snail
- Primitive snail
8Module 8 — Flowers, food and finishing touchesProps, plant parts and the details that complete a scene.5 lessons
- Dandelion: flowers and leaves
- Glued felt strawberries
- Glued felt flowers
- Ice cream
- Expressive miniature eyes and thin eyelids
What you get
- 60+ full-format video masterclasses
Complete projects, filmed from the first blank to the finished figure.
- Patterns and reference drawings
An appendix with schematics and proportions for each project.
- Material and colour lists
So you can prepare your wool and tools before you press play.
- A dedicated technique module
Blanks, phase theory, glued felt and the small tools that make life easier.
- Miniature prop tutorials
Cheese, ice cream, boots, hooves and other scene-setting details.
- Immediate, permanent access
The whole library unlocks at once and stays open.
- A 14-day money-back guarantee
Watch the first projects and decide whether the method suits you.
Is this library for you?
This course is for you if…
- Complete beginners who want a structured path rather than scattered free tutorials
- People who have felted a little and keep ending up with soft, shapeless figures
- Crafters who want to make small animals, birds and characters as gifts or for sale
- Anyone who prefers to learn by following a full project rather than watching theory
- Hobbyists looking for an evening activity that needs a table, not a workshop
Probably not a fit if…
- Anyone looking for live classes, scheduled sessions or one-to-one feedback — this is a recorded, self-paced library
- People who want a quick fifteen-minute craft and are not interested in building a technique
- Needle felters working at large scale or making flat 2D pictures; the focus here is small three-dimensional figures
- Sewers and knitters looking for fabric or yarn projects
After the library
The most visible change is on your shelf. Instead of one experimental blob, there is a row of small figures that look like the animals they are meant to be: a rat mid-curtsy, a raccoon with a rod over its shoulder, a crow with cheese. Friends will pick them up, turn them over and ask how the legs are attached.
The quieter change is in how you approach a new idea. You will be able to look at a photograph of an animal and plan it: which blank shape to start from, where the volume goes, which parts need wire, which details can wait until the end. That planning habit is what turns a hobby into a skill you can keep developing on your own.
Some people stop there and keep making figures for themselves and as gifts. Others start taking small commissions or selling at local fairs, because a 5–6 cm character is a manageable, repeatable product. Whatever you choose, you keep the library and can return to any project when you want to make it again, faster and better.
Questions before you order
How much time do I need each week?
There is no weekly schedule. A small project such as the hamster or the hedgehog usually takes a few evenings; a bird with long legs and layered feathers takes longer. You can work for twenty minutes at a time and leave the figure half-finished on the table.
Do I need previous felting experience?
No. The first module starts with materials, tools and the basic ball, and the early projects are deliberately forgiving. If you have felted before, the theory-of-phases lesson is still worth watching because the rest of the library builds on it.
What tools and materials will I need?
Felting needles in a few gauges, a foam or brush mat, coloured wool in the shades listed for each project, and a small amount of wire and glue for some figures. Every masterclass opens with its own material list, so you can buy only what a given project requires.
What format are the lessons in?
Recorded video, filmed close-up at working speed, with the reasoning explained as the figure is built. Each project also comes with an appendix containing patterns, reference drawings and material lists.
How do I get access after payment?
Access is granted automatically once the payment is confirmed. You receive a confirmation with your sign-in details and the full library is unlocked immediately — there is nothing to wait for and no start date.
How long does the material stay available?
The library stays available to you after purchase, with no expiry date. You can return to a masterclass months later, rewatch a single step, or work through the modules in a completely different order.
Can I work through the projects in any order?
Yes. The modules are grouped by theme for convenience, not as a strict sequence. Many people begin with the small rodents or the bird they like most, then go back to the foundation module once they have a feel for the wool.
What if the library is not for me?
You have 14 days from purchase to ask for a refund. Write to support, tell us what did not work for you, and the payment is returned. There is no need to justify the decision beyond that.
Start with one small animal
Pick a project, lay out your wool, and watch the first blank come together this week.